Insulating a Wooden Garage
Inside a wooden garage
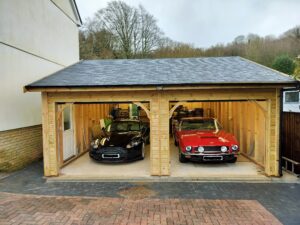
Wooden garages are by nature, much warmer than concrete or brick built structures. This means they provide an ambient climate suitable for classic cars and motorbikes, even if you leave the building in it’s standard finish.

Standard garage finish is suitable for classic cars
The benefits of insulation and internal lining.
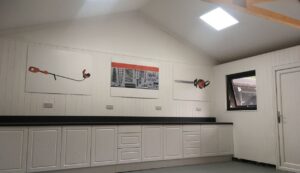
Whilst the standard finish will provide adequate protection for years to come, the inside leaves the opportunity for insulation and internal lining to easily be added. This is where you can really add your own finishing touches. A flat and smooth wall suddenly provides great opportunities for tool storage, shelving or pictures and make your garage a great workshop.
Prior to the insulation however, it makes sense to add any services you intend to fit.
Installing electric cables should go through the studwork, especially if you want the cables to be hidden. Water pipes should also be added at this stage, if you are intending to fit a handbasin, or a WC.
Insulation
Returning back to the job of insulation, the walls on our garage allow 75mm insulation to fit easily into the cavity. Note that 100mm insulation is too thick as the studs are finished at 95mm, as they were planed in the factory for consistency. The 75mm insulation also allows an air gap when lining the inside of the garage wall.
The choice of insulation currently on the market is between rockwool and rigid boards – the second example either being PIR or Jablite.
Rockwool insulating properties are relatively poor, and the product has a tendency to sink behind the boarding over time. Acoustic Rockwool however, is the next level up, and provides much more insulation and sound resistance due to the compactness of the product. It is easy to fit and doesn’t sink over time either.
Rigid boards are either polystyrene sheets or foam boards with aluminium bonded to both sides. Polystyrene (or Jablite) is on a par with Acoustic Rockwool and provides suitable sound and heat insulation – especially for a garage. Celotex or Kingspan is the more expensive option, which includes aluminium either side of the foam board. This gives good sound insulation and a much better heat insulation compared to the other options available. In essence – it is the best insulation product readily available.
NOTE: If choosing the polystyrene (Jablite), the grey wiring cable cannot contact the insulation, as a chemical reaction can cause the wiring cable to melt. Therefore either a channel must be cut, or trunking must be used for wiring a garage with this insulation.
Lining the garage walls
Once the insulation has been added, naturally the inside lining is the next stage in the process. 12mm plywood or OSB is the most common lining board due to price and durability. Plasterboard is another option as is MDF, however both have more downsides than positives. Plasterboard is brittle requires a finish, plus it is in an environment where walls could get a bit battered. MDF can take the knocks, but does not look good if oily fingers and overalls make contact with it.
If you’re choosing between ply and OSB, not that the plywood looks much more like a house wall if you paint it white, as opposed to the OSB looking like the chipboard it is.
NOTE: Insulation and lining will create a fridge type effect, whereby the temperature within the building will take longer to match the temperature on the outside. This could mean that without heating, it will be colder inside the garage during the winter than the standard finished garage.
Insulating the ceiling
The pitched roof is a little more complicated to insulated, simply due to the height and angles that are involved. Firstly, there MUST BE AN AIRGAP between the underside of the OSB roof boards, and the top of the insulation. Failure to include this gap will cause the roof to condensate, and rot the roof board from within the garage.
In most cases the timber purlins are 125mm thick, and we would recommend at least 50mm clearance from the insulation to the lining board.
Again you have a choice of insulation, however we would suggest the polystyrene or PIR as you can easily gauge the distance above the insulation if you line it up with the bottom of the purlin.
Don’t forget any wiring if you need to add it before the boards are fitted, so that lighting can easily by added.
Whilst you can fit the insulation yourself, it takes at least two people to install the lining boards. Again, either plywood or OSB are the norm, although MDF could be used for the ceiling as it doesn’t contact any elements or dirty hands / overalls (or at least we’d hope it doesn’t)
In terms of lighting – we would recommend the LED panels either flush fit or surface mounted, as they look like velux windows are flooding natural light into the garage.
Finally, we would suggest painting the inside with a good quality wood paint even for interior use. We recommend royal exterior from Shedcare, as this paint is designed for both interior and exterior timber, and is available in a plenty of colours.

Inside Finished By Customer 4
